


Art Nouveau room - modeling by Crtomir Just
Art nouveau room – modeilng
"Art Nouveau room - modeling" by Crtomir Just
Introduction:
This scene started of as an opposition to millions of clean interior renders you see on the internet everyday. Not that those renders aren’t good (many of them are superb), I just wanted to make something different, something that has a nice warm feel to it, something that has something to say.
I’m very fond of art and it’s history, among others I especially like the Art nouveau period (the french expression for “new art”), which emerged at the end of the 19 th and reached it’s peak at the beginning of the 20 th century. The style started off as a response to the industrial world of machinery and automation, which started to neglect nature and it’s diversity. The artists of that period, as oposing to the numb world around them, expressed themselves with curved lines, hyperbolas and parabolas, winding plant forms and nature motifs, which are the main characteristics of the Art nouveau style. Some of the great artists belonging to this period are: Antoni Gaudi, Gustav Klimt, Alfons Mucha, Edvard Munch, Henry van de Velde, Victor Horta, Henri de Toulouse-Lautrec, Louis Majorelle, Hector Guinard, Louis Comfort Tiffany, Henri Rousseau.
So I decided to make an old room, which dates in the mentioned period, that means it would be about 100 years old now. Making it look old and worn out turned out to be quite a challenge.
In this tutorial I will try to cover the key elements in making of this scene. The modelling alltogether isn’t anything special really, I put much more effort in texturing and lighting, which turned out to be almost the hardest part in making this scene.
Preparations:
I had the basic idea of how the space should look like in my head. Therefore I started of without a sketch, which I don’t really recommend, because it took me a lot of time to define all the details and I changed a few general things along the way, which at some point I didn’t like, etc. Anyway, it’s good to have at least a basic sketch, before you start.
I had to get all the information I needed about the Art nouveau style. I already knew something about it, but needed more information in the terms of elements and their details. The art history books were a good start, but still not enough, so I started searching for reference pictures on the internet, which turned out to be very useful. I also needed some patterns, that had the characteristics of art nouveau designs, to use with textures, but I will explain more of that later on in the texturing part.
Picture 1: Some of the examples I used as reference material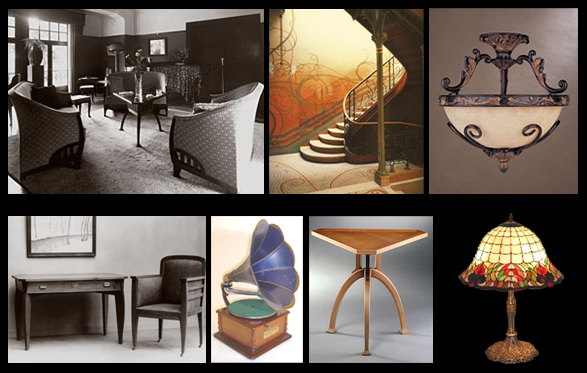
Setting up the scene:
I started out with only one room at first, but then decided that it would be good to make one more, the back room, so that the view gets a little more interest and depth. That way I also got more space, where I could add some more elements in the distance, which adds a lot to the diversity and reality of the scene. You can see the setup of the two rooms in the picture below.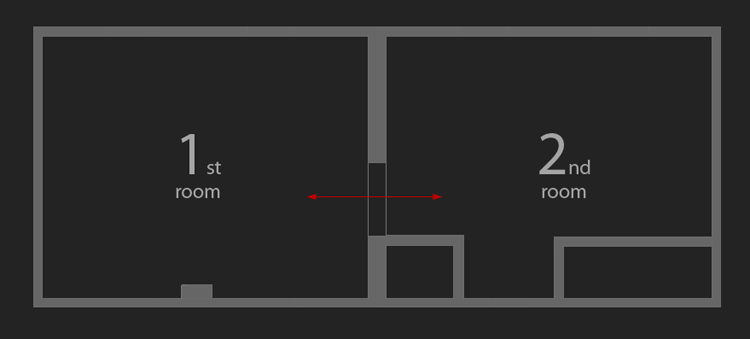
Picture 2: Setup of the two rooms
Modelling:
As I sad, the overall modelling in this scene isn’t anything special. Mostly it’s all simple box, poly and spline modelling (plus booleans and some objects made with the lathe modifier) with some adjustments and smooth modifiers applied. However there are some detailed elements, that I will explain.
The basic structure of the room is a simple box, to which I added a shell modifier. I could have extruded polygons to make the walls, but I decided to use the box method, cause it seemed faster and easier, since I didn’t have a sketch to work with. The downside of this method was, that I had to add some more boxes to make the remaining walls and then attach them to each other as editable polys, so I could unwrap it the way I wanted. If I had a birds eye view of the walls sketched, it would probably be better to use the extrusion method and avoid the additional procedures.
I used boolean operations to make the openings for the windows and the door which leads to the back room. And that covers all the boolean operations used in this scene.
The next step was modelling the floor. I decided to to make it from wooden boards, which coresponds well with the period of art nouveau. I made a box, convert it to editable poly and chamfered its edges, then I used the array command to multiply it along one of the axis and atached all of the boxes to make a single object. To make it less uniform and therefore more realistic, I grabbed some of the vertices and moved them, so the boards got more diverse in width (b), and also cloned (a) some of the boards and adjusted their vertices to get more diversity in length (c) as seen on picture 3.
Picture 3: Making diversity of the floor boards
The windows are also made from converted boxes of different sizes with the help of the inset, extrude and and slice plane commands. A similar method was used for the stairs, except the basic shape was an extruded polygon made from splines.
Some elements were modelled precisely to the reference pictures (for example the table, chairs and the cabinet), some of them are combinations of diferent reference pics. However I was forced to design some elements on my own too (the staircase and the small bookcase); the reason for this was either the lack of reference or the dislike of it.
The radiators started off as instanced boxes with an edit poly modifier applied to them, so I could model the connections between them - again using the slice plane command, extruding the new polygons and chamfering some of the edges. At the top of the modifier stack there is a meshsmooth modifier, which makes the radiators look like they’re supposed to. The pipes are just renderable splines; the connections to the radiator and the walls and also the knob are modified cylinders.
Picture 4: Process of creating the radiator
I tried to match the chairs ans table from Henri van de Velde as close as possible to the reference pictures, which wasn’t that easy, since I only had one reference view of the furniture.
I made the framework of the chairs from boxes and splines with an edit poly modifier added to them and then extruding, rotating and adjusting the faces. To make the task a little easier, I only made one half of the chair and then used the simmetry modifier on it. The cushions for the chairs are also boxes but with increased segments; I used the soft selection method here and moved some vertices to make the edges and the transition between the framework and the cushions nice and smooth.
The table legs are box modelled and the top part of the table is made of a few chamfered cylinders. The basic shape of the curved part which connects the top part of the table with the legs is made from a spline – also used extrude, inset and added a meshsmooth modifier.
Picture 5: Modelling the furniture
It was a bit tricky to make the gramophone. I went for the NURBS modelling technique here to make one part of it. First I drew the basic spline for the shape of the gramophone, then I used circular array to duplicate it and so I got the edges of the shape made only from splines. Now I had to use the ruled surface option within the NURBS creation toolbox with two of the splines to get one basic surface. I modified this surface to get the rounded look at the top and then just arrayed this shape the same as before and drew some more splines for the remaining edges with the snap option on. The rest of the gramophone are just some modified boxes, splines and cylinders.
Picture 6: Modelling the gramophone using NURBS, splines and boxes
The staircase was one of the things I couldn’t find a good reference for, so I ‘designed’ and modelled it myself. Nothing special really, I made the most of it from splines and just made them renderable. The spiral shapes are made from helixes, the bottom one which connects the staircase to the wooden stairs has also some height set up, so it looks like a spring of some kind. The balls are spheres, which sit at the ends of some spiral elements.
Picture 7: The staircase
The ceiling light is made from some lathe objects, spheres, cones and splines. For the basic shape of the element which connects the light to the ceiling I used a spline and then added the lathe modifier to it. The spherical part of the light is made from two spheres, cut in half in the sub-object mode. For the small curved details, that start at the bottom, I used path deform. I made a cone, that had a few height segments and a spline (I had to use snap to get it on the surface of the light), that I used for the path. Then I applied the path deform modifier to the cone and selected the spline as the path.
Picture 8: Making the ceiling light
The curtains were made with the help of the cloth modifier. I started with a plane, that had quite a few segments, applied the wave modifier to it and then converted it to editable poly, so I could fix the shape by moving some vertices with the soft selection method turned in. The next step was adding the cloth modifier – I could have used the garment maker to make the cloth behave in a more natural way, but the result with a simple plane was good enough for me in this case. I simulated the cloth and added some wind, ran simulate again and stopped it when it looked the way I wanted it. To give some thickness to the curtains, I used the shell modifier. Finally I put a noise modifier on top of the stack, just to make the curtains look a little more non-uniform.
Picture 9: Process of meking the curtains
That covers the modelling part of this tutorial, I’m not going to explain how I made the remaining objects, because it’s just basic modelling and it is similar to the things i wrote before.
(c) Crtomir Just, crti_just@yahoo.com
Click for viewing tutorial on free3dtutorials .